Remember the free dresser that I found almost a year ago?
The one that I was going to convert into a buffet for our dining room?
Well, I finally finished it! Read on for the full reveal!
I used Annie Sloan's Chalk Paint in Emperor's Silk for this project. Don't confuse this with chalkboard paint. That's something completely different. I have been reading about this for a long time now and wanted to try it out. This paint is perfect for furniture painting. There is no prep work when you use this paint- no priming or sanding. That's what makes is unique. It also covers really well and usually you only need one coat. The can looks small, because it is. But this stuff goes a long way. I only used about 1/4 of the can on this entire project. It seems pricey at $42 a can but, when you add in the price so stripper, primer, sand paper, and paint, it evens out. I buy mine at the Smitten Flea in McKinney, but you can also have it shipped to you.
If you want to learn more about this paint or see some tutorials, visit my two favorite blogs Perfectly Imperfect (she's got a great breakdown of the prices) and Miss Mustard Seed.
This paint goes on thick, but it spreads pretty easily.
I did end up having to put on 2 coats because one coat didn't cover it as much as I wanted. But even with 2 coats, I still only used 1/4 of the can! Pretty crazy, right?
I loved the bright red color, but it wasn't the right shade for our dining room. To darken it, I rubbed stain on the paint and the wiped it off. I did 2 coats of this as well.
It was kind of scary at first...see the difference in the drawers that have stain and the top of the dresser? But when the stain was wiped off, it left a perfect dark tint to the red.
Here's the difference. The top drawer is only painted and the bottom drawer has been darkened.
This dresser wasn't in the best shape (hey, it was free) but I wanted to make it work for us. The top had some water damage coming through so I had to get creative in how to cover this up. Y'all know I love burlap, right? I decided to make a sort of permanent table runner and glue burlap to the top of the dresser to cover up all those rough water spots.
I taped off the areas that would border the runner and then used spray adhesive to glue the burlap down.
After gluing the burlap, it needed something else. It looked sort of naked. So my genius husband mentioned adding a ribbon to border it.
I used hemming tape to adhere the ribbon to the edge of the burlap. Now it looks like a runner!
Looks good, huh? Justin thought I was crazy when I first told him about my idea, but we both really like how it looks.
The stain left some areas darker that others. You can see it in this picture. But I wanted this piece to look old, and worn...kinda dirty so adding the stain helped give that effect.
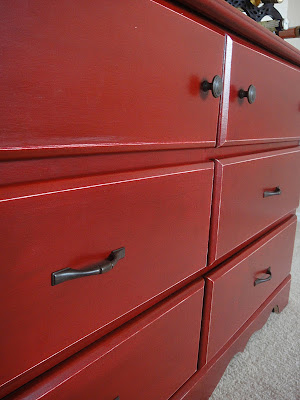
I ran into the problem of the paint not sticking to the edges of the drawers. It was so weird. The paint covered so well every where else. But it was an easy fix. I just lightly distressed all the edges to match the drawers. I replaced the hardware to match the brown runner ribbon. I like the clean lines of this hardware. The original was kind of bulky and overpowered the dresser.
Total cost for this project was about $35.
I used about $12 worth of Annie Sloan's Chalk Paint.
The hardware was $23.
I had the burlap and ribbon left over from our wedding.
What do y'all think?
I think it turned out alright for my first painting job.









Jordan, You did an amazing job!! You found a new calling....furniture refinishing!!
ReplyDeleteGreat job! Love the color!
ReplyDeleteSo cute girl! You are making me want to do all my projects sitting around in my garage!! :))
ReplyDeleteSo beautiful! Nice work :) I'd love for you to come share at my new link party: http://www.dwellonjoy.com/2012/01/dwell-on-fridays-two.html
ReplyDeleteHope to see you there :)
Wow Jordan! It looks AMAZING! You are so crafty and creative. ;)
ReplyDeleteThis turned out beautifully! I've got to try some of that paint...I see so many using it! Would be delighted for you to link to my brand new party: http://www.ishouldbemoppingthefloor.com/2012/01/mop-it-up-mondays-party-1.html
ReplyDelete{HUGS},
kristi
your newest follower ; )
gorgeous!!
ReplyDeletethat looks amazing- the bold red is awesome!
ReplyDeleteJordan that looks amazing!! You did a great job with the top, I would have never thought of that. Dee
ReplyDeleteLove how the color came out, and it looks like you picked yourself a keeper in that hubby of yours! Adding the ribbon as a finishing touch was genius!
ReplyDeleteI love what you did to the top! Such a creative way to deal with watermarks. The color is fabulous too!
ReplyDeleteI love the the color and table runner! Very excited about using this paint - did you use the Annie Sloan wax after painting?
ReplyDeleteHi! I love your red dresser and am featuring it today on my Friday Finds. Thanks!
ReplyDelete