Showing posts with label crafts. Show all posts

Friday, December 21, 2012

Special Gift from Mama

 I don't have much time for myself these days, but I have managed to do a few Christmas projects since Lillie has  come home.  It feels nice to craft again.  When I was pregnant, I was too tired or had too much going on.  This past year has been super, super busy for us!


These aren't the best ornaments, but I threw this together for the dogs this year.  We found house chipboard at Hobby Lobby.  The house had a chimney, but Justin cut it off turning it into a perfect shape for a dog house! 
 
 
For Lillie, I made this bird security blanket.  While I was still pregnant, I looked for months in stores and online to buy one for her.  When I couldn't find one, I decided to make one.  Little did I know that I would be able to give my girl this special gift for her first Christmas!


The bird toy was a stroller toy that had rings and other doo dads hanging from it's wings.  I just cut them off, cut a slit in the middle of the blanket, sewed the bird in and added the ribbon.  I love the way it turned out and I hope she loves it too! 


Thursday, February 2, 2012

Valentine Wreath

I made this easy Valentine Day heart wreath for our front door and boy, do I love it!

I kept the colors pretty neutral so I can use it year round if I want.

Tuesday, January 17, 2012

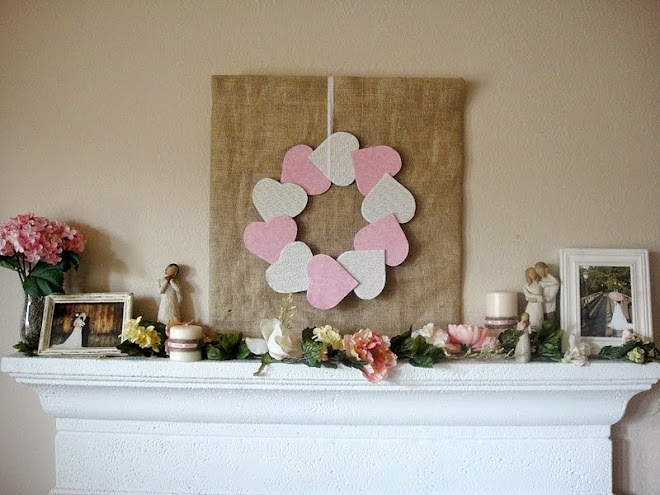
A Love Inspired Mantel

Valentine's Day is just around the corner and this year, I've decided to do a little decorating to celebrate!  I'm not going all out like I do for Christmas, but I thought having a Valentine's Day themed mantel would be nice and I'm going to decorate our dining room shelf too (pics of that to come when I'm finished.) 

Wednesday, January 11, 2012

Photo Ribbon

I've been making these photo ribbons as gifts and everyone has been loving them so I thought I'd share them with you today. 


Pinned Image
via pinterest

I found the idea on Pinterest but made it a little easier on myself by using coasters as the photo tiles rather than canvas.  

The first one that I made was in black in white and I love it.  But the colored photo tiles look really great too!


With each new one I make, I think of something more or different to add to it to make each ribbon unique. 

I can't wait to make my own!

Friday, December 23, 2011

DIY Ornaments

I have been making homemade gifts like crazy! And it has been so much fun!  I believe that it's better to give than receive.  So that's why I decided to give myself this ornament ;-)  In the middle of making gifts for others, I made a little time for myself and made an ornament of my own.


I don't have a tutorial for you today, but  you can check out this tutorial when I mod podge a picture frame and follow the same principle.  I just mod podged left over wrapping paper to an "H" chipboard, painted the sides and the back, and distressed the edges.  Then I wrapped twine around the top so that it could hang from the tree.  Isn't it lovely?!

I also made something special for someone else.


If your name is GRACE HARMON then stop reading now or your will ruin your Christmas.


If you read any further it'll be like sneaking into the living room when you were a kid and cutting the tape on the presents under the tree, carefully unwrapping the paper, and taking a peek into the boxes to see what awaits inside.  I did that one year and Christmas morning stunk for me.  There was no eager anticipation to see what I got, because I already knew.


So you gone now, Gracie?
I hope so 'cause here we go....


 Grace is my sister-in-law and just married into the family in October.  I made her this sheet music ornament for one of her Christmas gifts.  Decor made with sheet music is super popular right now.


 At first sight, it doesn't seem all that special.


But it's the lyrics on the sheet music that really make it unique.
"Wondering where would I be without you in my life"


 "But you brighten up for me all of my days"


Can anyone guess the song?


 "How sweet it is to be loved by you"

And it was Grace and Jason's first dance song at their wedding.


 I love this so much it makes my heart hurt.  

I'll be making one for Justin and I to hang on our family tree.

I cannot wait to give this to Grace!  I hope she loves it as much as I do!

If you'd like to see my inspiration for this ornament, check out my Pinterest pins here, here and here

Tuesday, December 20, 2011

Christmas Mantel and Shelf

 Here's the last of the home decorations!  


Our mantel is kinda a work in progress.  I made it look the best I could with the decorations that we already had.  I can't say that I hate it, but I don't love it either.  Hopefully next year I'll have more time and a little more money to make this look really good!
 

 I could never find a stocking that I liked for Dexter, so I decided to make one for him.  I saw this stocking on etsy and made my own dumbed down version.  I found the stocking at Dollar General for a buck and used felt and no sew iron on transfer for the doggie and bone.  I think it turned out really cute!  And It only cost me $1.50!


 My mama made me that cute little frame that you see on the wall.


Everyone asks if I made the snowflake wreath.  I wish I could say yes, but I found it at the dollar spot at Target.  


 Since it was so hot here over the summer, most of my candles melted in the attic.  But these weren't damaged so bad.  I made sure to cover up all the ugly spots with the poinsettias.


 So, there ya go.  The Harmon family Christmas mantel.  Needs some work, but looks good for this year!


 Here's the dining room shelf that went from fall to Christmas!


 I switched out the framed pumpkin for a handmade snowflake.


 The ornaments were originally in a clear cylinder vase, but the shelf fell off the wall somehow and broke it.  So I opted for the mason jar in its place.  I think that I like it better than my initial idea!  It ties in together with the "snow filled' mason jars on the dining room table.


I found a plain wooden 8x10 picture frame at Dollar Tree and painted it red specially for this printable.

 How have you decorated your home this Christmas?  I'd love to see!  Leave me a comment with your blog address, facebook page, etc if you'd like to show of your home decorations!

Wednesday, December 14, 2011

Christmas Table Centerpiece

Since my dining room table is so small (it's a 4 seater) I don't have much room for an extravegant centerpiece.  I have to go small and simple.  I saw this idea on pinterest and thought it would be perfect for our table. 


It's supposed to look like the candles are laying in snow.  The jars are partially filled with epsom salt.


 Instead of using a third mason jar, I decided to use a salsa bottle to mix it up a bit and give it a little more character. 


 To add a bit more detail, I topped each jar off with a rafia bow and wound this wire edge ribbon in and aroudn teh jars.  I think it turned out really pretty and goes really well with the rest of the decor in the room.

Friday, October 21, 2011

Witch Broom Door Hanger

 Halloween is next week so I've been busy getting the house spookified for our party!


Here's a little somthing I made for our front door to welcome all the ghouls and witches that will be coming to visit next Saturday. 

Wednesday, October 19, 2011

DIY Wall Plaque

I love vinyl wall art, but I don't like the price.

$35 Etsy
 Source: etsy.com via Jordan on Pinterest

There are lots of DIY tutorials, but I don't own and can't afford a Silhouette machine.


So I decided to make my own vinyl wall art and I L-O-V-E (no pun intended, ha)  the way it turned out!


Wanna make your own? It's so easy!


I painted the sides of the wooden plaque turning the ugly gold to dark brown.


Then I applied a thin layer of Mod Podge to the top of the plaque.  I wanted to cover up "Welcome to our Ranch."  Not so big on western decor...


So I covered the front of the plaque with the pretty scrapbook paper.


Because my paper was too short to cover the entire face at one time, I had to improvise.  I covered the front as much as I could, let it dry and then covered the other half.  The tricky part was lining up the design so that it would flow nicely and the pattern wasn't too terribly off.


Then I got my brown paint back out and roughly swiped it around the edges to give it a distressed rustic look. 


After the paint was dry, I put the Dollar Tree vinyl wall art on top and Mod Podged the entire think to make sure it was all sealed up and protected. 

Isn't it lovely?


  Do you love my birds?  ::Swoon::  I've loved birds for a long time (maybe cause my nickname is j-bird...ah, old softball days) so I've been trying to incorporate them in the house as much as Justin will let me.  He hasn't said no yet! ;)


 So what do you think?  It cost me less than $5 to make this because I found everything on sale or clearanceI've got a few more of these babies that I'm going to make for different parts of the house.  When I have a chance to get them finished, I'll show y'all how they turned out!


Friday, September 23, 2011

DIY Tile Coasters


I've been seeing these tile coasters everywhere and they are so pretty!  We have a couple sets of decorative coasters and I love them both, but they don't really go with the decor of our living room.  So I thought I'd give these diy tile coasters a try and see if I could make some!

I deviated a bit from the directions of the common tile coaster.
  I'm such a rebel. 

Here's what I did:
Related Posts Plugin for WordPress, Blogger...