Showing posts with label repurposing. Show all posts

Sunday, January 26, 2014

DIY Hall Tree from Old Door

We don't really have an entry way to our house, and it's kinda annoying.  Everyday when I leave for work, I have my fancy Coach purse, my lunch box, and a tote back with my gym clothes.  That's a lot for one person, not to mention a mom.  Add to that a diaper bag, a nap mat, milk, diapers, wipes.  Sheesh.  That's a lot of stuff.  When we come home every day, my purse goes on one of our extra dining room chairs (I have a strict rule that Coach NEVER goes on the floor-I work hard to spoil myself!) and the rest gets thrown on the floor.  It makes the room looked so cluttered and I never really know where anything is.  So I talked Justin into making me a hall tree. 


We repurposed a closet door that I bought from Restore for $10.  I have seen these pop up all over Pinterest and I fell in love with the idea. 
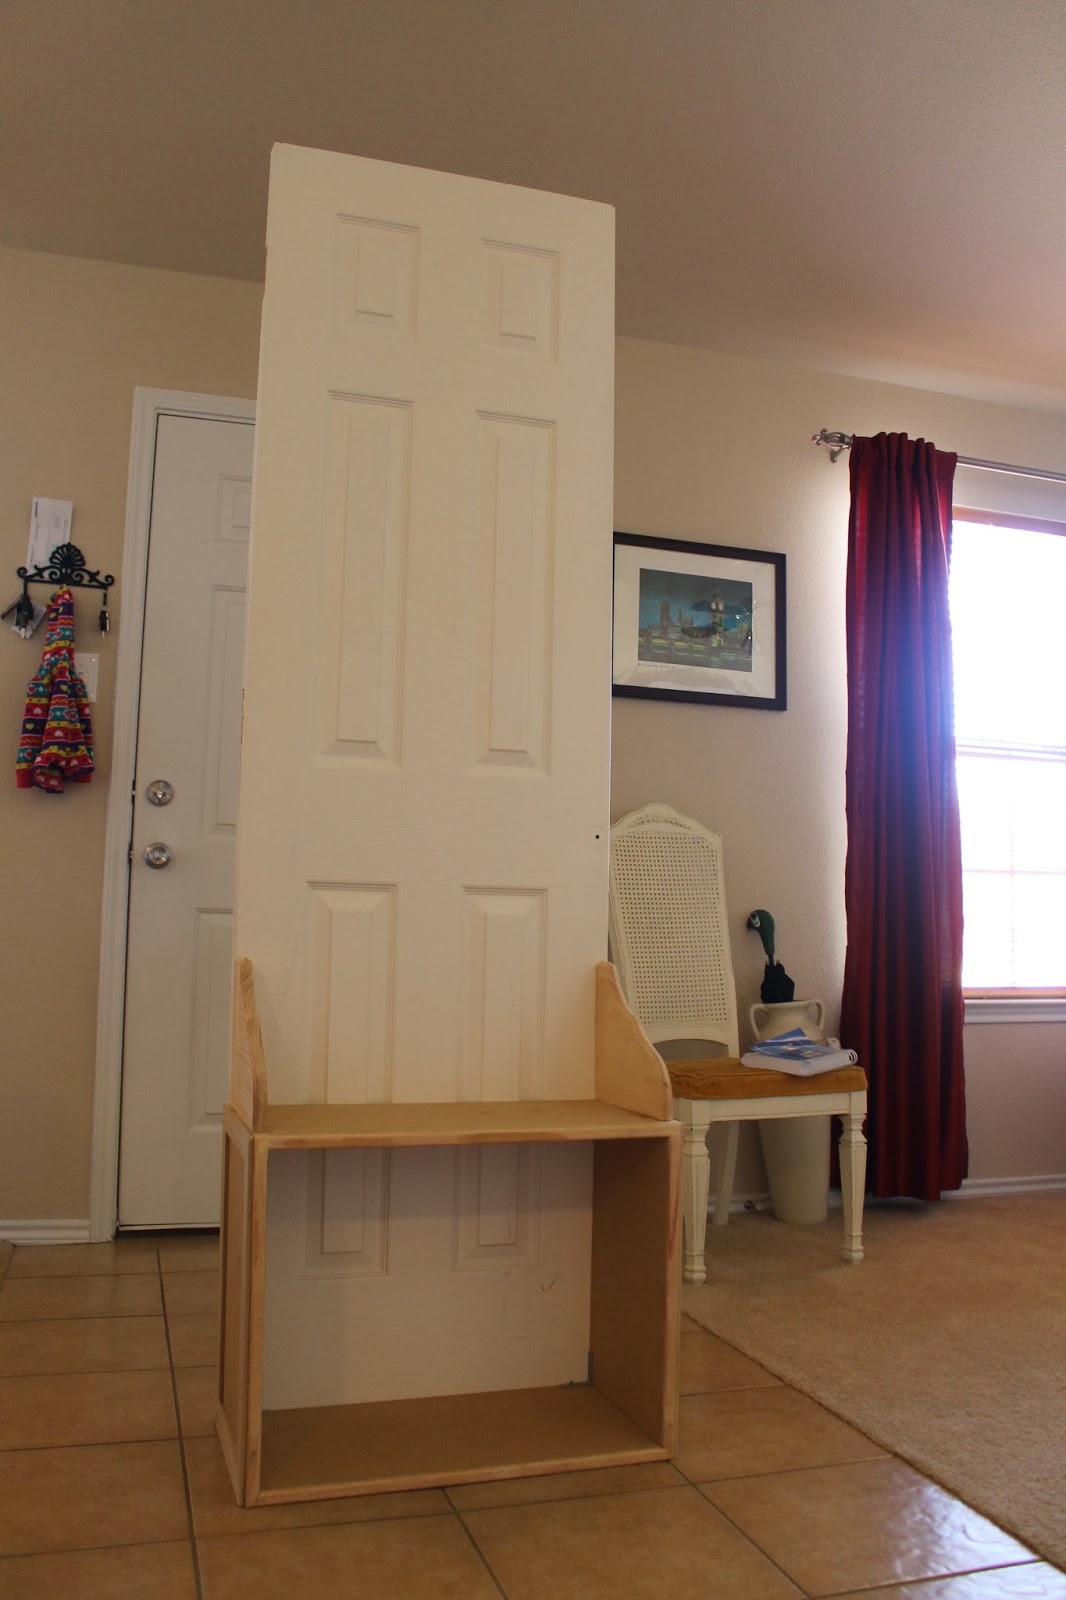
 
 
We bought MDF board (because it was cheap.  Normally we would have used a better wood) and cut it to create a box that would be attached to the door.
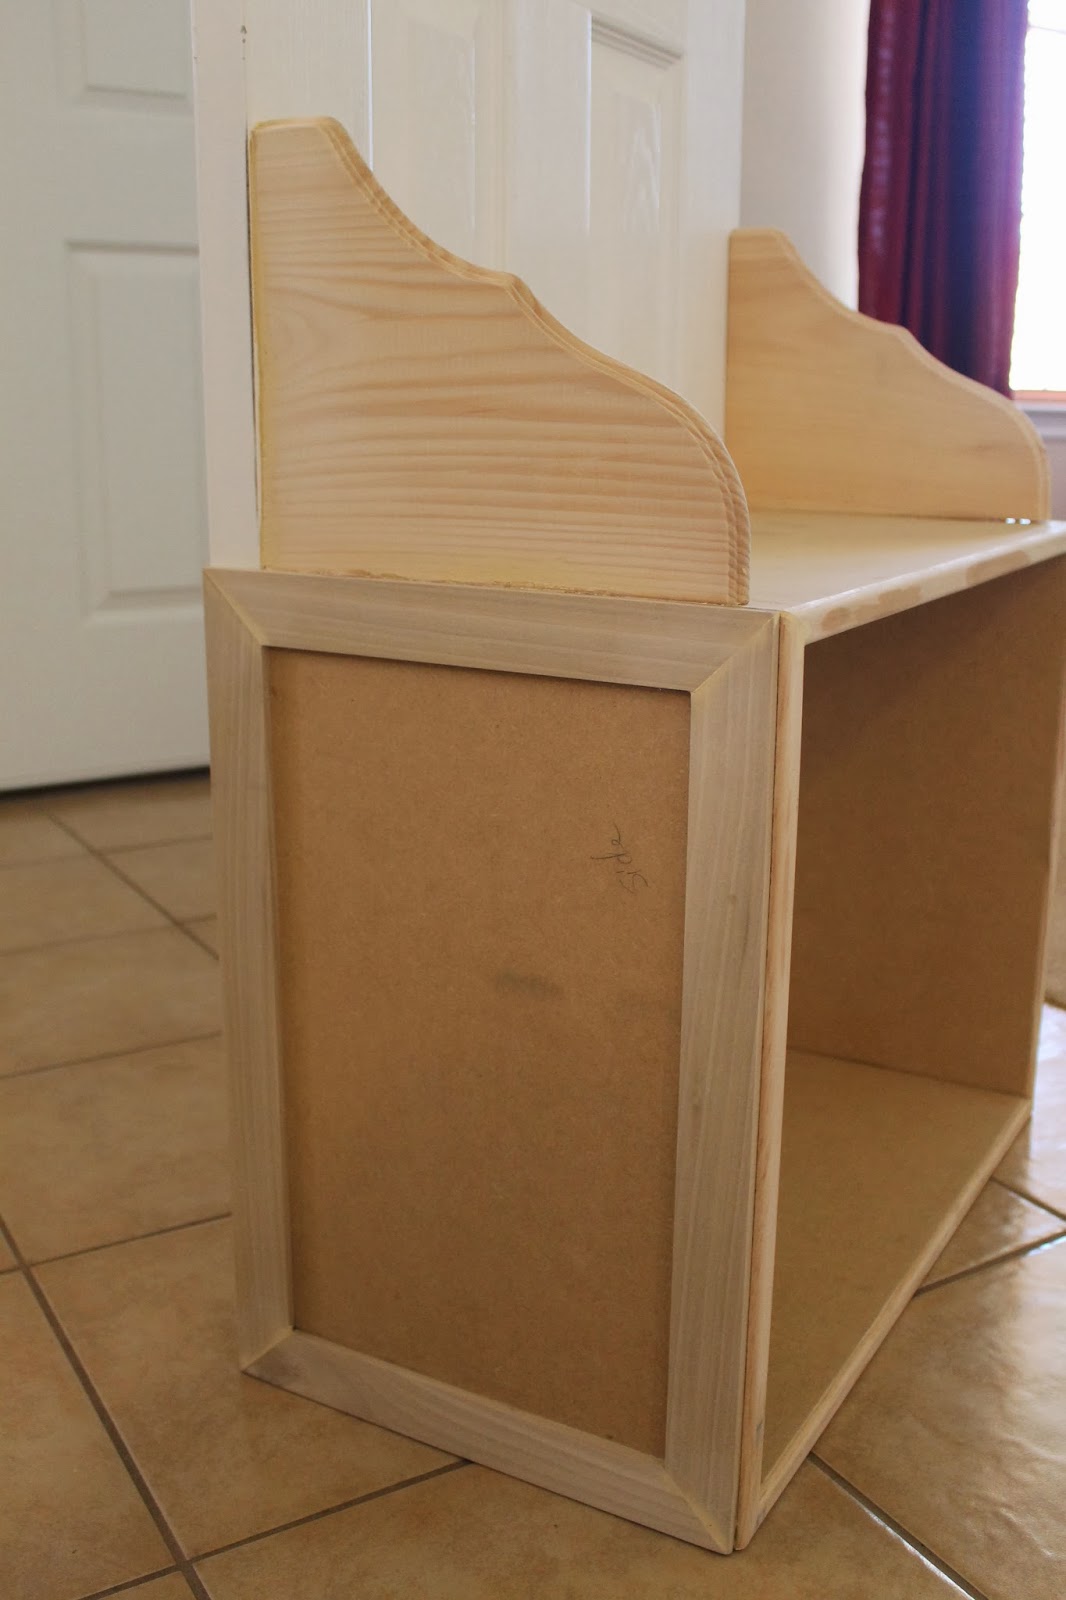


I didn't want my bags falling onto the floor, so we bought wood shelf brackets and attached them to each side.  We wanted the hall tree to have a simple look and feel to it, so we added trim to the front and sides of the MDF box to give it a nice touch. 
 
 
We used Valspar Signature paint in creme fraiche in a satin finish.  This is the perfect white.  Not too bright, but no hint of yellow.  The satin finish is sleek.  Just glossy enough to wipe normal wear and tear marks off, but not enough where it has a glean to it.
  
 
 You can see the trim detail here after it was painted and it gives it just the right look to keep in with my rustic décor. 
 
 
The legs we repurposed from Justin's old night stands.  We have converted the night stands to another project (that I haven't had a chance to write about) and we had 4 left. I think lifting the hall tree up off the floor makes it look so classy.
 
 
 I found the coat hooks and the door knob from Hobby Lobby.  We had already been using the key holder and decided to keep it. It was just screwed into the wall, so I think it will like it's new home. 
  
 
 The door knob is not actually a real knob, more like a décor piece that we placed to look like an old knob. It had a wall hanger on the back but we were able to use screws on each side to hold the knob in place.
 
 
 I really love how it turned out.  It was such a simple project and we were able to finish it up in just 2 afternoons (even with a 1 year old running around!)  They only thing I would have changed was maybe to add some kind of ring or something on the side to store umbrellas.  But that would be easy to add in later.  I might also add a shelf to the top, but I think it looks great without it.
 

 Total Price for the Project: $42
Door: $10 from Restore
MDF Board: $8
Wooden Brackets: $6
Trim: $3
Legs: Repurposed from nightstands
Paint: Left over from another project
Coat Hooks: $9
Key Holder: What we were currently using
Door Knob: $6


Now we have a place to put all of our things.  It's been so nice to have everything together in one place to grab to head out the door or to empty our arms when we get home.

Sunday, January 29, 2012

Dresser Turned Buffet Reveal


Remember the free dresser that I found almost a year ago? 

The one that I was going to convert into a buffet for our dining room?

Well, I finally finished it!  Read on for the full reveal!

Friday, October 21, 2011

Witch Broom Door Hanger

 Halloween is next week so I've been busy getting the house spookified for our party!


Here's a little somthing I made for our front door to welcome all the ghouls and witches that will be coming to visit next Saturday. 

Wednesday, October 19, 2011

DIY Wall Plaque

I love vinyl wall art, but I don't like the price.

$35 Etsy
 Source: etsy.com via Jordan on Pinterest

There are lots of DIY tutorials, but I don't own and can't afford a Silhouette machine.


So I decided to make my own vinyl wall art and I L-O-V-E (no pun intended, ha)  the way it turned out!


Wanna make your own? It's so easy!


I painted the sides of the wooden plaque turning the ugly gold to dark brown.


Then I applied a thin layer of Mod Podge to the top of the plaque.  I wanted to cover up "Welcome to our Ranch."  Not so big on western decor...


So I covered the front of the plaque with the pretty scrapbook paper.


Because my paper was too short to cover the entire face at one time, I had to improvise.  I covered the front as much as I could, let it dry and then covered the other half.  The tricky part was lining up the design so that it would flow nicely and the pattern wasn't too terribly off.


Then I got my brown paint back out and roughly swiped it around the edges to give it a distressed rustic look. 


After the paint was dry, I put the Dollar Tree vinyl wall art on top and Mod Podged the entire think to make sure it was all sealed up and protected. 

Isn't it lovely?


  Do you love my birds?  ::Swoon::  I've loved birds for a long time (maybe cause my nickname is j-bird...ah, old softball days) so I've been trying to incorporate them in the house as much as Justin will let me.  He hasn't said no yet! ;)


 So what do you think?  It cost me less than $5 to make this because I found everything on sale or clearanceI've got a few more of these babies that I'm going to make for different parts of the house.  When I have a chance to get them finished, I'll show y'all how they turned out!


Monday, October 10, 2011

Fall Mantel

The mantel has been done since the beginning of September, but I'm just finding the time to sit down and share it with y'all.  Just in time to change it in the next few weeks for Halloween!


Justin surprised me with flowers the other day and they went up on the mantel for us to enjoy!


Remember when I said I wanted another Willow Tree figurine for our anniversary?  Well, I got it!  Isn't it so pretty?


This is a pumpkin candle.  It was in our attic.  Candles don't do so well in attics over the summer in 100 + temperatures.


I wanted to have a main focal point for the mantel, but didn't have any money to really make something spectacular.  So I used what I already had and made this!  I covered up our poppy canvas with some craft paper that was used as stuffing in a box for an item that was shipped to us, drew a pumpkin and then painted it with some craft paint that I already had.  I'm not artistic, so I was very pleased at how it looked!


I love decorating for fall.  All the warm colors make the house so cozy!

Sunday, October 2, 2011

Fall Wall Shelf

Do you ever make something,change your decorations in your house, or decorate for the holidays and feel like something isn't quite right?  Like something is just a little off?


That's exactly how I felt when I decorated our wall shelf in fall decor.  I liked everything on the shelf, but it just felt like there was something missing. 

Friday, September 23, 2011

DIY Tile Coasters


I've been seeing these tile coasters everywhere and they are so pretty!  We have a couple sets of decorative coasters and I love them both, but they don't really go with the decor of our living room.  So I thought I'd give these diy tile coasters a try and see if I could make some!

I deviated a bit from the directions of the common tile coaster.
  I'm such a rebel. 

Here's what I did:

Monday, August 29, 2011

All in the Family

Remember my sister, Em?  I made the scrapbook paper wall plaques for her new apartment as a little house warming present.  Well, it turns out that she has a creative side too!  And she's even better than me!  Where I mostly use other's ideas for my inspiration, she's actually used her noggin to completely design and create her own diy home decor.  This is perfect for college students who are trying to decorate their dorm rooms or those moving into their first apartment and don't have a big budget for decorating.  I'm so excited to be able to feature her project!

Here's what she made!  Isn't it cute!  She used the  tops off of old shoe boxes to make this super cool, modern wall display.  Canvas is pricey, and if you are anything like my sister and love shoes, you have TONS of shoe boxes in your closet  just waiting for you to create something beautiful.


 She took her box tops and painted them these pretty, bright colors to match her bedroom.


 She found a spool of thread to use as a template to draw her circles.


Then she traced her lines.


And then she finger painted her design!  She is so smart :) I bet this entire project cost her less than $3 because all she had to buy was the paint.  Am I right, Em?


And now she has something totally fabulous to hang above her bed!

Good job Em!  I can't wait to see what you make next!

Monday, August 15, 2011

DIY Scrapbook Paper Wall Plaques

My sister, Em, is moving into a new apartment this semester and she doesn't have much of a budget to spend on home decor.  I told her "No, problem!  Let me make ya something!"  Big sister to the rescue! ;)


Thursday, August 11, 2011

DIY Distressed Vase

This was my first DIY project.  I loved this wooden vase.  I loved the hydrangeas.  I loved the hydrangeas in the vase.  I loved the hydrangeas in the vase on this dresser.  They were perfect for the guest bedroom.  I didn't love the brown on brown  of the vase against the dresser.


So, I decided to paint it.  I roughed it up a bit with sand paper so that the paint would stick.  I primed it and then used spray paint to color it a nice creamy color.  After the paint was dry, I used sand paper to make the distress marks so it would have that old rustic feel that I love so much.  After I was done distressing, I put the hydrangeas back in and it looked so pretty!


I really love the way it turned out!  The cream color looks great with the dresser.  And the distressing gives it that antique feel that goes great with the family heirloom accent pieces that I have around it.  The jewelry box was my grandma's, the perfume bottle was my mama's, the compact was my great grandma's (and it even has powder still in it!) and the harmonica was given to me by my sister last year for Christmas, well because it has my last name in it.  We now call it the HARMON-ica.  Ha ha. 


Friday, August 5, 2011

DIY Dog Pillow/Bed


Sweet little Dexter has been so mistreated.  He's been sleeping in his crate with just this measly old blanket to keep him comfortable. 


He'd rather lay on this old egg crate than that hard crate tray.  Hmmm....my wheels are turning.  I think I feel a project coming on!  I think I'll repurpose this old egg crate and a fleece blanket and make him his own pillow!

Thursday, June 16, 2011

Hanging Votive Wall Decor Re-Do

I received the most beautiful hanging candle holder for my birthday.  My lovely future sister-in-law gave it to me.  The colors perfectly matched the guest bathroom, but there was a problem...the holders were linked together vertically so I'd have to hang it on the ceiling.  Hmmm, I loved it but I just could never seem to get it to look right.  So I made this instead!


Read more to see what it looked like before I transformed it!

Related Posts Plugin for WordPress, Blogger...